
Monday, January 6, 2014
Simple but lovely housewarming gift
Loofah, t.p., bucket, candle, lotion, ribbon, wooden dowel, check! This is what I came up with for a simple housewarming gift for a dear friend:
Monday, February 6, 2012

Succulent Garden
Succulent Garden, easy peasy! Fill a large pot 1/4 of the way up with drainage rock. Add potting soil until you reach 1/2 inch from the top, plant the succulents, then fill the top with more drainage rock.

Thursday, February 2, 2012
Floating Shelves
My husband and I built these ourselves and I couldn't be happier with the result. Floating customized shelves! We weathered the wood by hammering away at it. Then stained it to match our dining room table. I can't wait to fill them with junk..... I mean classy pieces of art.


Saturday, November 12, 2011
Simple Wedding Hair Flower
Simple and to the point, a flower for your hair. No over the top fluff where a bird would want to nest. I made this for one of my best friend's wedding hair. Supplies needed:


- White flowers
- Hot Glue Gun
- Bobby Pin
- Gems/Bling
- Tulle
 |
| White Flowers, Bobby Pin, and Crystal Bling |

 |
| Finished product |
 |

Thanks for reading. Keep on Crafting!
Friday, April 15, 2011
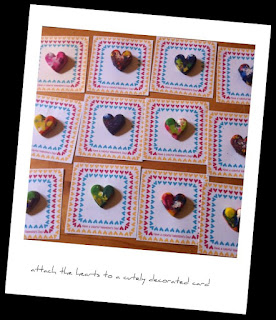
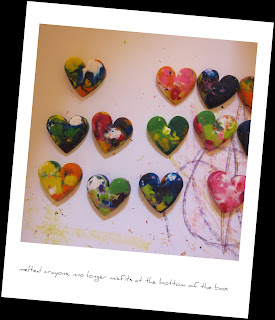
Recycled Crayon Hearts
My childs art box holds the misfits of all crayons. I couldn't help but feel bad throwing away little broken pieces. So for this Valentine's day we decided to be "green" (yellow, blue, pink, orange, and black) and recycle all my little one's misfit of crayons. The kids loved them and they turned out so cute! Free download from http://thelongthread.com/wp-content/uploads/2010/01/colorful-valentines-day-cards2.pdf
- Materials
- Crayon pieces (help your little ones by chopping different colored crayons)
- Heart-shaped silicone mold (we got ours from IKEA, they also have other molds that would be really cute to create)
- Scrap paper
- Double-sided foam mounting tape or hot glue gun
- Scissors
- Colored card stock
- Marker
Place the silicone ice tray full of mixed crayons into a preheated oven of 275 degrees F.. Watch them carefully, they will melt fast. Bake them for about 7-8 minutes. When they look melted enough, carefully and slowly remove them from the oven. You can stir them with a toothpick for a swirly look, or leave them as is. Let them cool completely (can be placed in the freezer to speed up process)
Finally pop them out. Be creative! Attach them to cardstock or decorated paper.


Subscribe to:
Posts (Atom)